Step by step guide
...
Table of Contents
...
Overview
Elevator for JIRA's escalation status can be integrated easily into JIRA Service Desk by adding the Elevator for JIRA custom field. You can utilise all the power of the JIRA Service Desk such as custom queues, automation and SLA alerting to inform and enrich your support teams visibility of escalated issues.
Create an automated escalation
- At the bottom left of your project page select the cog
 to access the project administration page
 - Under Request Types options select Automation
- Select Add your first automation rule
- Select Custom Rule
...
- Name your Automation accordingly
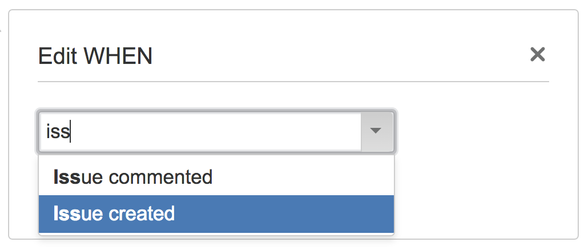
- Select WHEN then Add a trigger
- Drop down the WHEN box and choose Issue created
...

IF
- Select IF and select the + to add a condition
- From here you can either use the BASIC search function or the advanced search where you use an JQL query
- For BASIC select your custom field and the option
- For Advanced enter your JQL query i.e. "Issue Severity" = "Severity 1"
...
| Info | |
|---|---|
The "Bypass Elevator Permissions Checks" option allows users who normally would not be allowed to eg Escalate an issue to take this action. This can be used in combination with configuring the automation to "Run as the user who triggered the rule" to allow service desk customers to trigger escalations when they create issues | |
| Tip | |
| Success! | |
| Now when a Severity 1 issue is created it will be automatically escalated to the chosen roster |
...
Create an escalation queue
- The below demonstrates how a JIRA Service Desk queue can be built to list Active Escalations for the support teams to monitor and track, simply add the Escalation status customer field to your search criteria
...